Funding for Agri-food Data Canada is provided in part by the Canada First Research Excellence Fund
new feature
Maintaining clean, consistent data remains one of the biggest challenges in data management. Entry codes—also known as picklists—have long played a key role in improving data quality by standardizing how information is captured. Building on this foundation, a new Entry Code Library feature has been introduced in the Semantic Engine schema writer, making it easier than ever to reuse proven standards and reduce errors at the point of data entry.
The Value of Entry Codes (Picklists)
Entry codes provide a structured alternative to free-text data entry. Instead of allowing users to manually type values, entry codes limit input to a predefined list of acceptable options. This approach helps:
- Prevent spelling mistakes and inconsistent terminology
- Ensure uniform data across datasets and projects
- Improve searchability, aggregation, and downstream analysis
By capturing standardized codes rather than variable text, datasets become more reliable, interoperable, and easier to maintain over time.
Introducing the Entry Code Library
Based on direct user feedback, the Semantic Engine team has introduced an Entry Code Library to streamline schema creation and encourage reuse of existing work.
When defining a variable in the schema writer, users who select List as their initial data type now gain access to a premade library of entry codes.

Rather than building a list from scratch each time, you can browse and search the library for existing code lists that meet your needs.
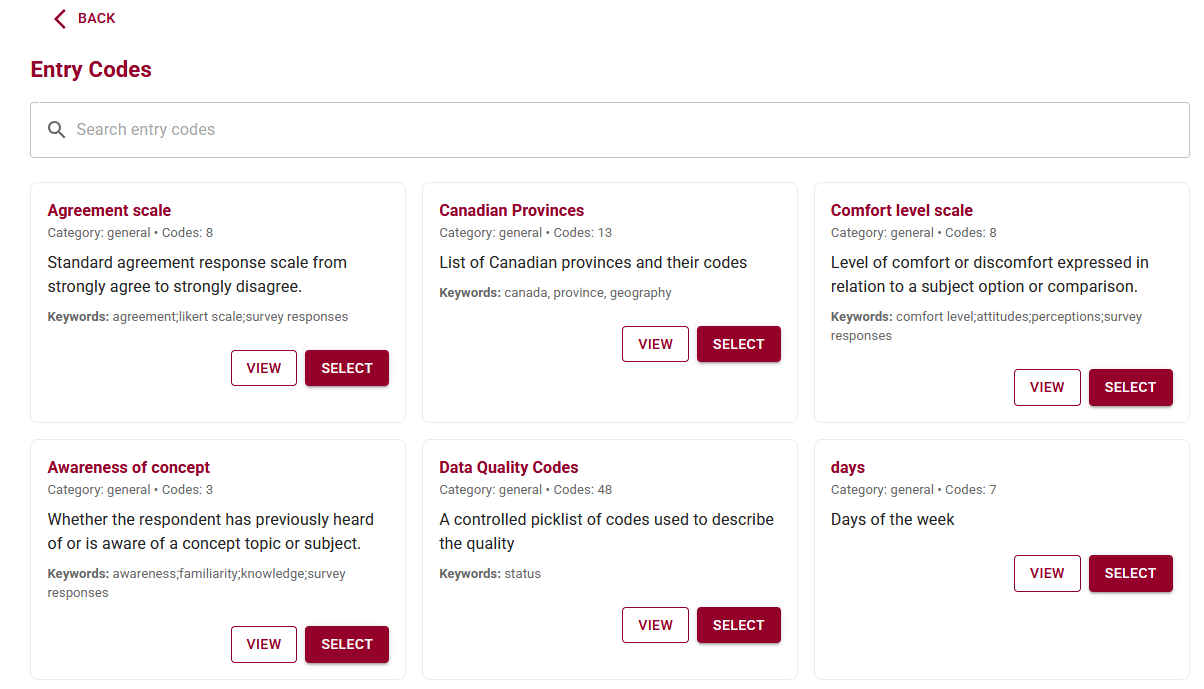
Search, Reuse, and Align with Standards
The Entry Code Library is designed to save time and improve consistency by helping users:
- Search for commonly used entry code lists
- Reuse established vocabularies and standards
- Avoid duplication of effort across projects
- Reduce data cleanup caused by inconsistent entry values
By leveraging shared entry code lists, datasets across teams and domains can align more easily, improving overall data interoperability.
Contributing to the Library
The Entry Code Library is a growing resource. If you have created—or identified—a code list that you believe would be valuable to others, we encourage you to contribute.
If you see a list you would like added to the library, please contact us at adc@uoguelph.ca.
Your contributions help build a stronger, more reusable ecosystem for high-quality data entry.
Moving Toward Cleaner Data by Design
Entry codes have always been a powerful tool for enforcing consistency at the point of data capture. With the introduction of the Entry Code Library in the Semantic Engine schema writer, users now have even greater support for creating standardized, reusable, and error-resistant schemas.
By combining structured entry codes with shared libraries and community input, data quality improves not after collection—but from the very beginning.
Written by Carly Huitema
On November 19th, Carly Huitema presented (YouTube link) at the Trust over IP 5-Year Symposium on emerging opportunities to use ORCID as a trust registry to help build secure, verifiable research data spaces. As research becomes increasingly digital and distributed, identity plays a central role in how data is created, shared, and validated. ORCID is already foundational to this ecosystem, and new standards such as Decentralized Identifiers (DIDs) open the door to extending its function beyond its original scope.
ORCID’s Existing Role in Trust and Attribution
For more than a decade, ORCID has provided the research community with a simple but essential service: a persistent, globally unique identifier for every researcher. ORCID IDs sit at the centre of scholarly workflows, connecting people to publications, datasets, affiliations, peer reviews, grants, and contributions.
ORCID IDs reduce ambiguity, streamline reporting, and support better attribution. Because ORCID records are self-maintained, researchers can manage their own scholarly identities while benefiting from integrations with publishers, repositories, and institutions.
One important feature is ORCID’s use of trust signals. When an external organization—such as a university or publisher—adds data to a researcher’s ORCID record, a green check mark appears. This indicates that the information was supplied by a trusted, authenticated source rather than by the researcher alone. These verified entries help create a more authoritative identity record, making ORCID a dependable reference point throughout the research landscape.
Why Bring Decentralized Identifiers Into the Picture?
The W3C’s Decentralized Identifier (DID) standard introduces cryptographically verifiable identifiers designed for secure digital interactions. Unlike traditional identifiers, a DID resolves to a DID Document, which contains:
-
Authentication keys — for proving control of the identifier.
-
Assertion keys — for signing statements such as dataset provenance records.
-
Key agreement keys — for establishing encrypted communication channels.
-
Service endpoints — for interacting with the DID subject or associated services.
The underlying storage of DID data varies depending on the DID method. It may be anchored in distributed ledgers, file systems, websites, or other registries. More than 200 DID methods exist, all interoperable through the same resolution model.
These keys provide practical capabilities:
-
Authenticate into systems using cryptographic proofs.
-
Sign datasets, workflows, and research outputs.
-
Securely transfer data using encrypted channels.
-
Support machine-to-machine operations with verifiable identity.
This aligns closely with the needs of modern research data ecosystems.
Two Proposals: How ORCID Could Support DIDs
Carly’s presentation introduced two possible integration models for combining ORCID with DIDs.
Proposal 1: Researchers List Their DIDs Within ORCID
The simplest model is allowing researchers to store one or more DIDs in their ORCID profile. ORCID remains the authoritative registry for researcher identity, while DIDs provide a layer of cryptographic capability.
This approach would enable:
Provenance Tracking
Researchers could sign datasets, computational workflows, or experimental logs using their DID keys, enabling verifiable provenance across repositories and platforms.
Authentication
DID authentication keys could be used for secure, passwordless login to research infrastructure—HPC clusters, repositories, cloud notebooks, and more.
Secure Data Transfer
Key agreement keys and service endpoints could support encrypted communication channels for sensitive or controlled-access data.
Building Data Spaces on Existing Keys
Research data spaces could use DID information listed in ORCID as a ready-made trust layer, without requiring a separate identity infrastructure.
This model preserves ORCID’s role while extending the capabilities of researcher identifiers.
Proposal 2: ORCID Hosts Full DID Infrastructure
A second, more ambitious additional option is for ORCID to operate DID infrastructure directly. In this model, ORCID could:
-
Allow researchers to create DIDs in addition to listing them.
-
Issue DIDs using DID methods suited for web publication (e.g.,
did:webvh,did:webs). -
Provide self-certifying identifiers with key pre-rotation support.
-
Maintain verifiable histories and cryptographic proofs of key and document changes.
-
Support witnesses or watchers that monitor DID updates.
-
Publish DID Documents via the ORCID registry for portability and persistence.
This would bootstrap more secure research data spaces by giving the entire ecosystem access to standardized, interoperable, verifiable researcher identifiers backed by ORCID’s trust framework.
This technology is freely available as open source tooling either from the Government of British Columbia (DID:webvh) or the KERI Foundation (DID:webs) and could be hosted by any organization (including ADC). The advantage of DIDs are that they are decentralized and can be operated by many different entities, and even used in combination for multi-key security.
Toward a More Verifiable Research Ecosystem
ORCID already plays a central role in identity and attribution. Adding support for Decentralized Identifiers—whether simply listed in profiles or fully hosted by ORCID, ADC or any other research data space – would expand its capabilities to include authentication, digital signatures, secure communication, and cryptographically verifiable provenance.
As research data spaces continue to develop, these capabilities become essential. ORCID’s existing trust signals, combined with DID-based cryptographic assurance, could form a powerful foundation for next-generation research infrastructure—linking people, systems, and data through verifiable, interoperable digital identity.
For further reference about these technologies check out the educational short videos at Bite Size Trust.
Written by Carly Huitema
In research environments, effective data management depends on clarity, transparency, and interoperability. As datasets grow in complexity and scale, institutions must ensure that research data is FAIR; not only accessible but also well-documented, interoperable, and reusable across diverse systems and contexts in research Data Spaces.
The Semantic Engine (which runs OCA Composer), developed by Agri-Food Data Canada (ADC) at the University of Guelph, addresses this need.
What is the OCA Composer
The OCA Composer is based on the Overlays Capture Architecture (OCA), an open standard for describing data in a structured, machine-readable format. Using OCA allows datasets to become self-describing, meaning that each element, unit, and context is clearly defined and portable.
This approach reduces reliance on separate documentation files or institutional knowledge. Instead, OCA schemas ensure that the meaning of data remains attached to the data itself, improving how datasets are shared, reused, and integrated over time. This makes data easier to interpret for both humans and machines.
The OCA Composer provides a visual interface for creating these schemas. Researchers and data managers can build machine-readable documentation without programming skills, making structured data description more accessible to those involved in data governance and research.
Why Use OCA Composer in your Data Space
Implementing standards can be challenging for many Data Spaces and organizations. The OCA Composer simplifies this process by offering a guided workflow for creating structured data documentation. This can help researchers:
- Standardize data descriptions across projects and teams
- Improve dataset discoverability and interoperability
- Support collaboration through consistent documentation templates (e.g. Data Entry Excel)
- Increase transparency and trust in data definitions
By making metadata a central part of data management, researchers can strengthen their overall data strategy.
Integration and Customization
The OCA Composer can support the creation and running of Data Spaces by organizations, departments, research projects and more. These Data Spaces often have unique digital environments and branding requirements. The OCA Composer supports this through embedding and white labelling features. These allow the tool to be integrated directly into existing platforms, enabling users to create and verify schemas while remaining within the infrastructure of the Data Space. Institutions can also apply their own branding to maintain a consistent visual identity.
This flexibility means the Composer can be incorporated into internal portals, research management systems, or open data platforms including Data Spaces while preserving organizational control and customization.
To integrate the OCA Composer in your systems or Data Space, check out our more technical details. Alternatively, consult with Agri-food Data Canada for help, support or as a partner in your grant application.
Written by Ali Asjad and Carly Huitema
Streamlining Data Documentation in Research
In of research, data documentation is often a complex and time-consuming task. To help researchers better document their data ADC has created the Semantic Engine as a powerful tool for creating structured, machine-readable data schemas. These schemas serve as blueprints that describe the various features and constraints of a dataset, making it easier to share, verify, and reuse data across projects and disciplines.
Defining Data
By guiding users through the process of defining their data in a standardized format, the Semantic Engine not only improves data clarity but also enhances interoperability and long-term usability. Researchers can specify the types of data they are working with, the descriptions of data elements, units of measurement used, and other rules that govern their values—all in a way that computers can easily interpret.
Introducing Range Overlays
With the next important update, the Semantic Engine now includes support for a new feature: range overlays.
Range overlays allow researchers to define expected value ranges for specific data fields, and if the values are inclusive or exclusive (e.g. up to but not including zero). This is particularly useful for quality control and verification. For example, if a dataset is expected to contain only positive values—such as measurements of temperature, population counts, or financial figures—the range overlay can be used to enforce this expectation. By specifying acceptable minimum and maximum values, researchers can quickly identify anomalies, catch data entry errors, and ensure their datasets meet predefined standards.
Verifying Data
In addition to enhancing schema definition, range overlay support has now been integrated into the Semantic Engine’s Data Verification tool. This means researchers can not only define expected value ranges in their schema, but also actively check their datasets against those ranges during the verification process.
When you upload your dataset into the Data Verification tool—everything running locally on your machine for privacy and security—you can quickly verify your data within your web browser. The tool scans each field for compliance with the defined range constraints and flags any values that fall outside the expected bounds. This makes it easy to identify and correct data quality issues early in the research workflow, without needing to write custom scripts or rely on external verification services.
Empowering Researchers to Ensure Data Quality
Whether you’re working with clinical measurements, survey responses, or experimental results, this feature lets you to catch outliers, prevent errors, and ensure your data adheres to the standards you’ve set—all in a user-friendly interface.
Written by Carly Huitema
In research and data-intensive environments, precision and clarity are critical. Yet one of the most common sources of confusion—often overlooked—is how units of measure are written and interpreted.
Take the unit micromolar, for example. Depending on the source, it might be written as uM, μM, umol/L, μmol/l, or umol-1. Each of these notations attempts to convey the same concentration unit. But when machines—or even humans—process large amounts of data across systems, this inconsistency introduces ambiguity and errors.
The role of standards
To ensure clarity, consistency, and interoperability, standardized units are essential. This is especially true in environments where data is:
-
Shared across labs or institutions
-
Processed by machines or algorithms
-
Reused or aggregated for meta-analysis
-
Integrated into digital infrastructures like knowledge graphs or semantic databases
Standardization ensures that “1 μM” in one dataset is understood exactly the same way in another and this ensures that data is FAIR (Findable, Accessible, Interoperable and Reusable).
UCUM: Unified Code for Units of Measure
One widely adopted system for encoding units is UCUM—the Unified Code for Units of Measure. Developed by the Regenstrief Institute, UCUM is designed to be unambiguous, machine-readable, compact, and internationally applicable.
In UCUM:
-
micromolar becomes
umol/L -
acre becomes
[acr_us] -
milligrams per deciliter becomes
mg/dL
This kind of clarity is vital when integrating data or automating analyses.
UCUM doesn’t include all units
While UCUM covers a broad range of units, it’s not exhaustive. Many disciplines use niche or domain-specific units that UCUM doesn’t yet describe. This can be a problem when strict adherence to UCUM would mean leaving out critical information or forcing awkward approximations. Furthermore, UCUM doesn’t offer and exhaustive list of all possible units, instead the UCUM specification describes rules for creating units. For the Semantic Engine we have adopted and extended existing lists of units to create a list of common units for agri-food which can be used by the Semantic Engine.
Unit framing overlays of the Semantic Engine
To bridge the gap between familiar, domain-specific unit expressions and standardized UCUM representations, the Semantic Engine supports what’s known as a unit framing overlay.
Here’s how it works:
-
Researchers can input units in a familiar format (e.g.,
acreoruM). -
Researchers can add a unit framing overlay which helps them map their units to UCUM codes (e.g.,
"[acr_us]"or"umol/L"). -
The result is data that is human-friendly, machine-readable, and standards-compliant—all at the same time.
This approach offers the both flexibility for researchers and consistency for machines.
Final thoughts
Standardized units aren’t just a technical detail—they’re a cornerstone of data reliability, semantic precision, and interoperability. Adopting standards like UCUM helps ensure that your data can be trusted, reused, and integrated with confidence.
By adopting unit framing overlays with UCUM, ADC enables data documentation that meet both the practical needs of researchers and the technical requirements of modern data infrastructure.
Written by Carly Huitema
When designing a data schema, you’re not only choosing what data to collect but also how that data should be structured. Format rules help ensure consistency by defining the expected structure for specific types of data and are especially useful for data verification.
For example, a date might follow the YYYY-MM-DD format, an email address should look like name@example.com, and a DNA sequence may only use the letters A, T, G, and C. These rules are often enforced using regular expressions or standardized format types to validate entries and prevent errors. Using the Semantic Engine, we have already described how users can select format rules for data input. Now we introduce the ability to add custom format rules for your data verification.
Format rules are in Regex
Format rules that are understood by the Semantic Engine are written in a language called Regex.
Regex—short for regular expressions—is a powerful pattern-matching language used to define the format that input data must follow. It allows schema designers to enforce specific rules on strings, such as requiring that a postal code follow a certain structure or ensuring that a genetic code only includes valid base characters.
For example, a simple regex for a 4-digit year would be:^\d{4}$
This means the value must consist of exactly four digits.
Flavours of Regex
While regex is a widely adopted standard, it comes in different flavours depending on the programming language or system you’re using. Common flavours include:
-
PCRE (Perl Compatible Regular Expressions) – used in PHP and many other systems
-
JavaScript Regex – the flavour used in browsers and front-end validation
-
Python Regex (re module) – similar to PCRE with some minor syntax differences
-
POSIX – a more limited, traditional regex used in Unix tools like
grepandawk
The Semantic Engine uses a flavor of regex aligned with JavaScript-style regular expressions, so it’s important to test your patterns using tools or environments that support this style.
Help writing Regex
Regex is notoriously powerful—but also notoriously easy to get wrong. A misplaced symbol or an overly broad pattern can lead to incorrect validation or unexpected matches. You can use online tools such as ChatGPT and other AI assistants to help start writing and understanding your regex. You can also put in unknown Regex expressions and get explanations using an AI agent.
You can also use other online tools such as:
The Need for Testing
It’s essential to test your regular expressions before using them in your schema. Always test your regex with both expected inputs and edge cases to ensure your data validation is reliable and robust. With the Semantic Engine you can export a schema with your custom regex and then use it with a dataset with the data verification tool to test your regex.
By using regex effectively, the Semantic Engine ensures that your data conforms to the exact formats you need, improving data quality, interoperability, and trust in your datasets.
Written by Carly Huitema
Using the Semantic Engine you can enter both your data and your schema and compare your schema against the rules of your schema. This is useful for data verification and the tool is called Data Entry Web (DEW).
When you use the DEW tool all your data will be verified and the different cells coloured red or green depending if they match the rules set out in the schema or not.
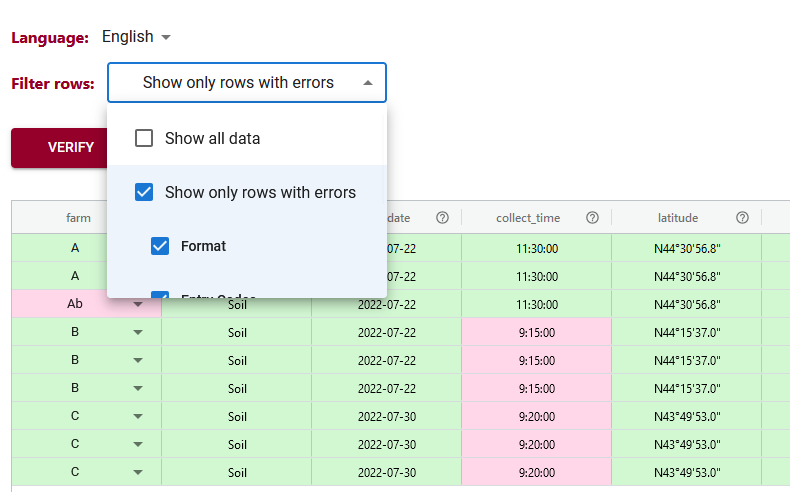
The filtering tool of DEW has been improved to help users more easily find which data doesn’t pass the schema rules. This can be very helpful when you have very large datasets. Now you can filter your data and only shows those rows that have errors. You can even filter further and specify which types of errors you want to look at.
Once you have identified your rows that have errors you can correct them within the DEW tool. After you have corrected all your errors you can verify your data again to check that all corrections have been applied. Then you can export your data and continue on with your analysis.
Written by Carly Huitema
Alrighty – so you have been learning about the Semantic Engine and how important documentation is when it comes to research data – ok, ok, yes documentation is important to any and all data, but we’ll stay in our lanes here and keep our conversation to research data. We’ve talked about Research Data Management and how the FAIR principles intertwine and how the Semantic Engine is one fabulous tool to enable our researchers to create FAIR research data.
But… now that you’ve created your data schema, where can you save it and make it available for others to see and use? There’s nothing wrong with storing it within your research group environment, but what if there are others around the world working on a related project? Wouldn’t it be great to share your data schemas? Maybe get a little extra reference credit along your academic path?
Let me walk you through what we have been doing with the data schemas created for the Ontario Dairy Research Centre data portal. There are 30+ data schemas that reflect the many data sources/datasets that are collected dynamically at the Ontario Research Dairy Centre (ODRC), and we want to ensure that the information regarding our data collection and data sources is widely available to our users and beyond by depositing our data schemas into a data repository. We want to encourage the use and reuse of our data schemas – can we say R in FAIR?
Storing the ADC data schemas
Agri-food Data Canada(ADC) supports, encourages, and enables the use of national platforms such as Borealis – Canadian Dataverse Repository. The ADC team has been working with local researchers to deposit their research data into this repository for many years through our OAC Historical Data project. As we work on developing FAIR data and ensuring our data resources are available in a national data repository, we began to investigate the use of Borealis as a repository for ADC data schemas. We recognize the need to share data schemas and encourage all to do so – data repositories are not just for data – let’s publish our data schemas!
If you are interested in publishing your data schemas, please contact adc@uoguelph.ca for more information. Our YouTube series: Agri-food Data Canada – Data Deposits into Borealis (Agri-environmental Data Repository) will be updated this semester to provide you guidance on recommended practices on publishing data schemas.
Where is the data schema?
So, I hope you understand now that we can deposit data schemas into a data repository – and here at ADC, we are using the Borealis research data repository. But now the question becomes – how, in the world do I find the data schemas? I’ll walk you through an example to help you find data schemas that we have created and deposited for the data collected at the ODRC.
- Visit Borealis (the Canadian Dataverse Repository) or the data repository for research data.
- In the search box type: Milking data schema
- You will get a LOT of results (152, 870+) so let’s try that one again
- Go back to the Search box and using boolean searching techniques in the search box type: “data schema” AND milking
- Now you should have around 35 results – essentially any entry that has the words data schema together and milking somewhere in the record
- From this list select the entry that matches the data you are aiming to collect – let’s say the students were working with the cows in the milking parlour. So you would select ODRC data schema: Milk parlour data


Now you have a data schema that you can use and share among your colleagues, classmates, labmates, researchers, etc…..
Remember to check out what you else you can do with these schemas by reading about all about Data Verification.
Summary
A quick summary:
- I can deposit my data schemas into a repository – safe keeping, sharing, and getting academic credit all in one shot!
- I can search for a data schema in a repository such as Borealis
- I can use a data schema someone else has created for my own data entry and data verification!
Wow! Research data life is getting FAIRer by the day!
![]()
There is a new feature just released in the Semantic Engine!
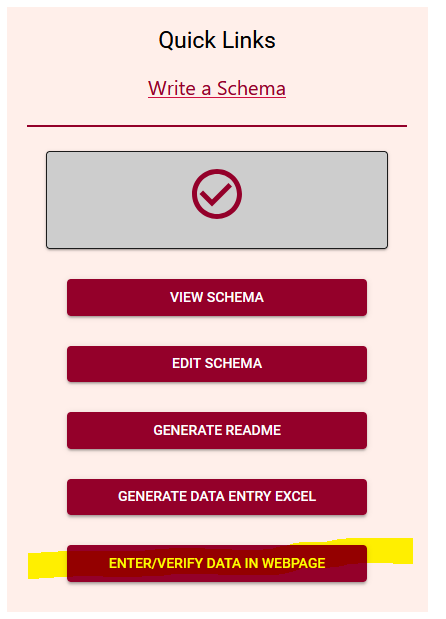
Now, after you have written your schema you can use this schema to enter and verify data using your web browser.
Find the link to the new tool in the Quick Link lists, after you have uploaded a schema. Watch our video tutorial on how to easily create your own schema.
Add data
The Data Entry Web tool lets you upload your schema and then you can optionally upload a dataset. If you choose to upload a dataset, remember that Agri-food Data Canada and the Semantic Engine tool never receive your data. Instead, your data is ‘uploaded’ into your browser and all the data processing happens locally.
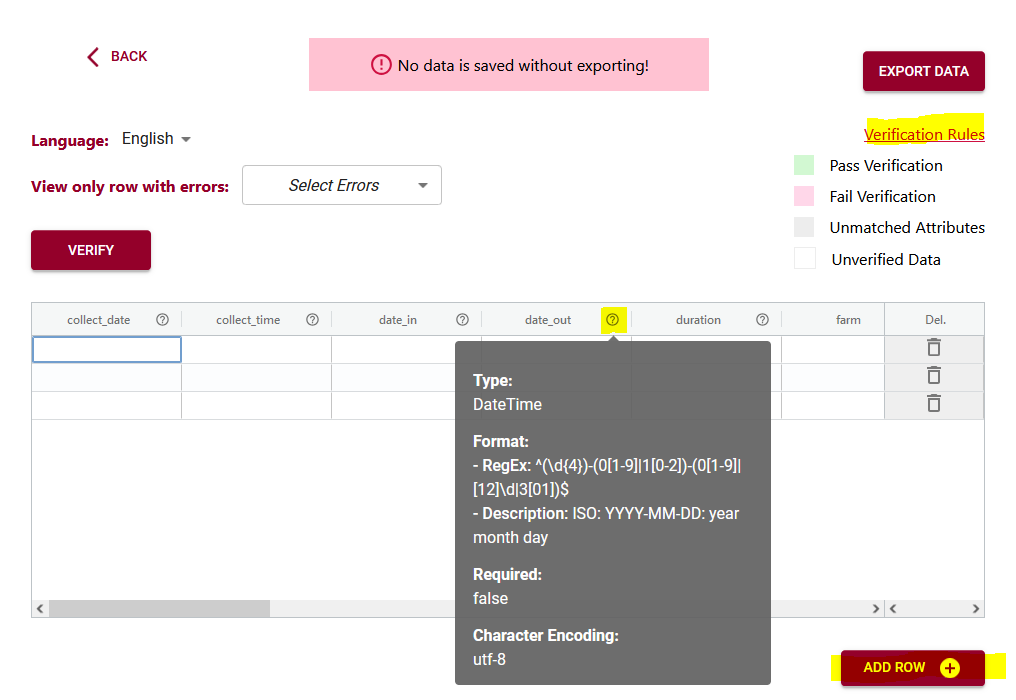
If you don’t want to upload a dataset, you can skip this step and go right to the end where you can enter and verify your data in the web browser. You add rows of blank data using the ‘Add rows’ button at the bottom and then enter the data. You can hover over the ?’s to see what data is expected, or click on the ‘verification rules’ to see the schema again to help you enter your data.
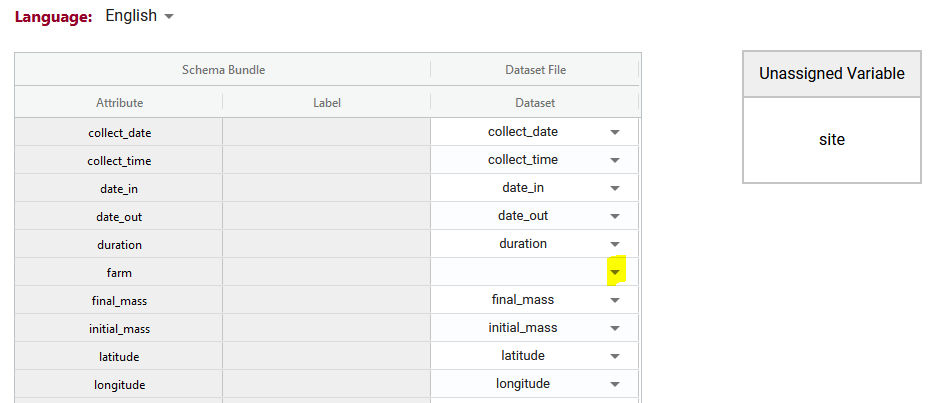
If you upload your dataset you will be able to use the ‘match attributes’ feature. If your schema and your dataset use the same column headers (aka variables or attributes), then the DEW tool will automatically match those columns with the corresponding schema attributes. Your list of unmatched data column headers are listed in the unassigned variables box to help you identify what is still available to be matched. You can create a match by selecting the correct column name in the associated drop-down. By selecting the column name you can unmatch an assigned match.
Matching data does two things:
1) Lets you verify the data in a data column (aka variable or attribute) against the rules of the schema. No matching, no verification.
2) When you export data from the DEW tool you have the option of renaming your column names to the schema name. This will automate future matching attempts and can also help you harmonize your dataset to the schema. No matching, no renaming.
Verify data
After you have either entered or ‘uploaded’ data, it is time to use one of the important tools of DEW – the verification tool! (read our blog post about why it is verification and not validation).
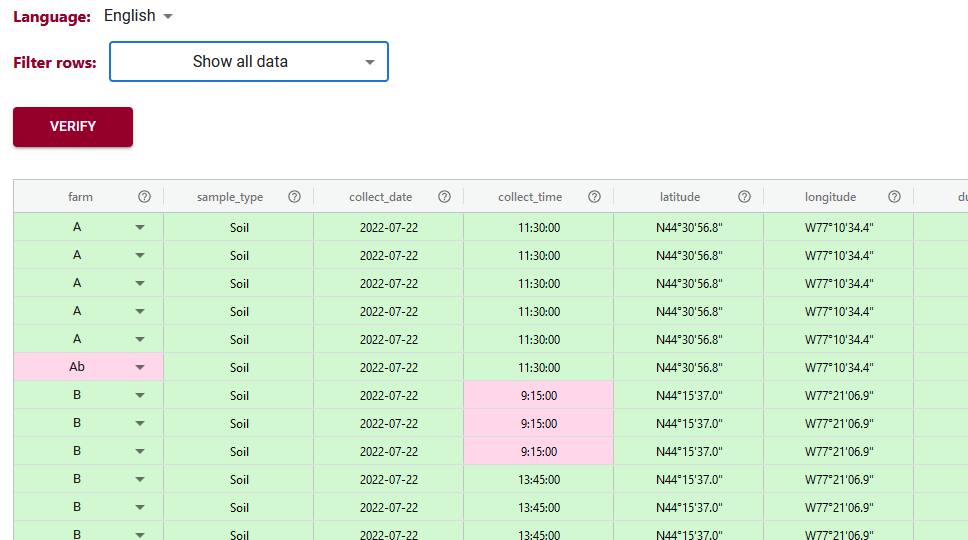
Verification works by comparing the data you have entered against the rules of the schema. It can only verify against the schema rules so if the rule isn’t documented or described correctly in the schema it won’t verify correctly either. You can always schedule a consultation with ADC to receive one-on-one help with writing your schema.
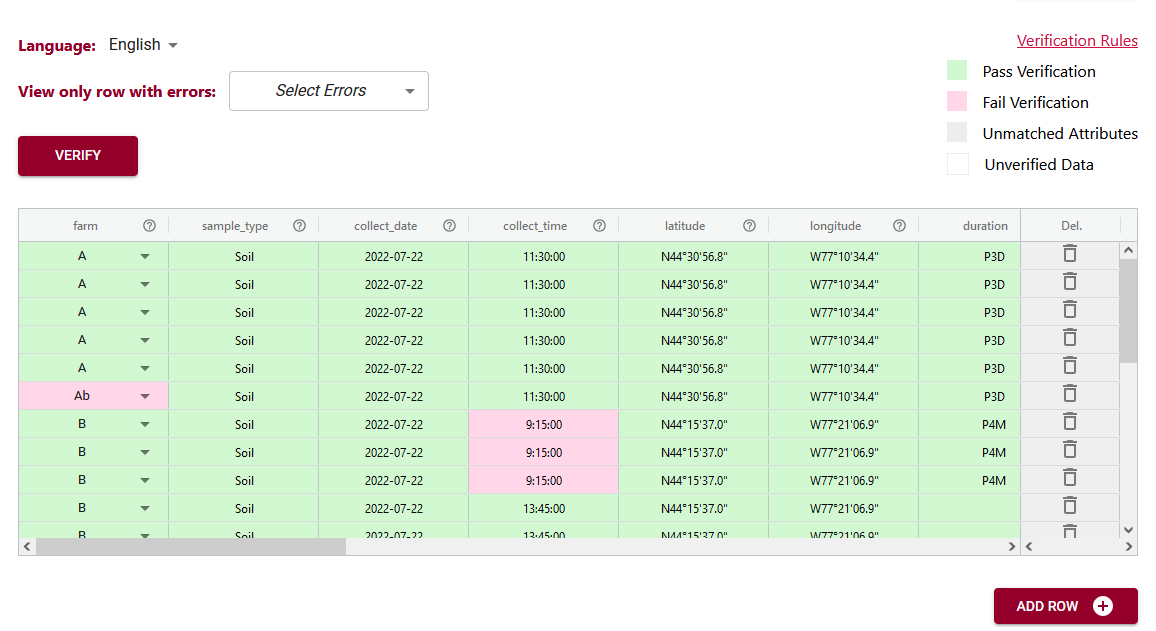
In the above example you can see the first variable/attribute/column is called farm and the DEW tool displays it as a list to select items from. In your schema you would set this feature up by making an attribute a list (aka entry codes). The other errors we can see in this table are the times. When looking up the schema rules (either via the link to verification rules which pops up the schema for reference, or by hovering over the column’s ?) you can see the expected time should be in ISO standard (HH:MM:SS), which means two digits for hour. The correct times would be something like 09:15:00. These format rules and more are available as the format overlay in the Semantic Engine when writing your schema. See the figure below for an example of adding a format rule to a schema using the Semantic Engine.

Export data
A key thing to remember, because ADC and the Semantic Engine don’t ever store your data, if you leave the webpage, you lose the data! After you have done all the hard work of fixing your data you will want to export the data to keep your results.
You have a few choices when you export the data. If you export to .csv you have the option of keeping your original data headers or changing your headers to the matched schema attributes. When you export to Excel you will generate an Excel following our Data Entry Excel template. The first sheet will contain all the schema documentation and then next sheet will contain your data with the matching schema attribute names.
The new Data Entry Web tool of the Semantic Engine can help you enter and verify your data. Reuse your schema and improve your data quality using these tools available at the the Semantic Engine.
Written by Carly Huitema
Let’s take a little jaunt back to my FAIR posts. Remember that first one? R is for Reusable? Now, it’s one thing to talk about data re-usability, but it’s an entirely different thing to put this into action. Well, here at Agri-food Data Canada or ADC we like to put things into action, or think about it as “putting our money where our mouth is”. Oh my! I’m starting to sound like a billboard – but it’s TIME to show off what we’re doing!
Alrighty – data re-usability. Last time I talked about this, I mentioned the reproducibility crisis and the “fear” of people other than the primary data collector using your data. Let’s take this to the next level. I WANT to use data that has been collected by other researchers, research labs, locales, etc… But now the challenge becomes – how do I find this data? How can I determine whether I want to use it or whether it fits my research question without downloading the data and possibly running some pre-analysis, before deciding to use it or not?
ADC’s Re-usable Data Explorer App
How about our newest application? the Re-usable Data Explorer App? The premise behind this application is that research data will be stored in a data repository, we’ll use Borealis, the Canadian Dataverse Repository for our instance. At the University of Guelph, I have been working with researchers in the Ontario Agricultural College for a few years now, to help them deposit data from papers that have already been published – check out the OAC Historical Data project. There are currently almost 1,500 files that have been deposited representing almost 60 studies. WOW! Now I want to explore what data there is and whether it is applicable to my study.
Let’s visit the Re-usable Data Explorer App and select Explore Borealis at the top of the page. You have the option to select Study Network and Data Review. Select Study Network and be WOWed. You have the option to select a department within OAC or the Historical project. I’m choosing the Historical project for the biggest impact! I also love the Authors option.

Look at how all these authors are linked, just based on the research data they deposited into the OAC historical project! Select an author to see how many papers they are involved with and see how their co-authors link to others and so on.
But ok – where’s the data? Let’s go back and select a keyword. Remember lots of files, means you need a little patience for the entire keyword network to load!! Zoom in to select your keyword of choice – I’ll select “Nitrogen”. Now you will notice that keywords needs some cleaning up and that will happen over the next few iterations of this project. Alright nitrogen appears in 4 studies – let’s select Data Review at the top. Now I need to select one of the 4 studies – I selected the Replication Data for: Long-term cover cropping suppresses foliar and fruit disease in processing tomatoes.
What do I see?
All the metadata – at the moment this comes directly from Borealis – watch for data schemas to pop up here in the future! Let’s select Data Exploration – OOOPS the data is restricted for this study – no go.
Alrighty let’s select another study: Replication Data for: G18-03 – 2018 Greens height fertility trial
Metadata – see it! Let’s try Data exploration – aha! Looking great – select a datafile – anything with a .tab ending – and you will see a listing of the raw data. Check out Data Summary and Data Visualization tabs!

Wow!! This gives me an idea of the relationship of the variables in this dataset and I can determine by browsing these different visualizations and summary statistics whether this dataset fits the needs of my current study – whether I can RE-USE this data!
Last question though – ok I’ve found a dataset I want to use – how do I access it? Easy… Go to the Study Overview tab scroll down to the DOI of the dataset. Click it or copy it into your browser and it will take you to the dataset in the data repository and you can click Access Dataset to view your download options
Data Re-use at my fingertips
Now isn’t that just great! This project came from a real use case scenario and I just LOVE what the team has created! Try it out and let us know what you think or if you run into any glitches!
I’m looking forward to the finessing that will take place over the next year or so – but for now enjoy!!
![]()